One lump, or two? A Titanic Tea

At RomCon this year, Deeanne Gist is hosting a Titanic Tea. I was very excited when she asked me if I could make her a dress. I love this era's dresses, and she had asked me to reproduce on of my favorite dresses ever!
I was going to make a dress for this year's YWU Double Period Pattern contest since they were doing 1812 and 1912. I have never had an interest in Regency dresses, but I was all over a Teens dress. Then Dee asks if I can make her exactly what I am looking at making for the contest! Serendipity, I tell you!
Unfortunately, the timing never worked out and I was unable to actually get the dress finished in time for the contest. I finished the day that Lyze Lynch was announced as the Best of Show winner with her 1812 'Ceres dress'. It is magnificent, and congratulations to her! :-)

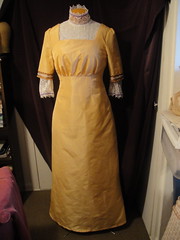
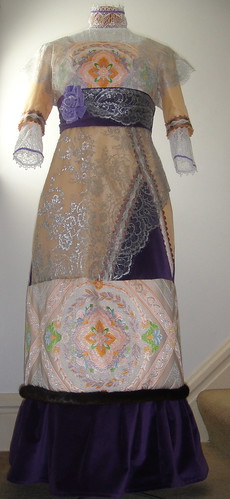
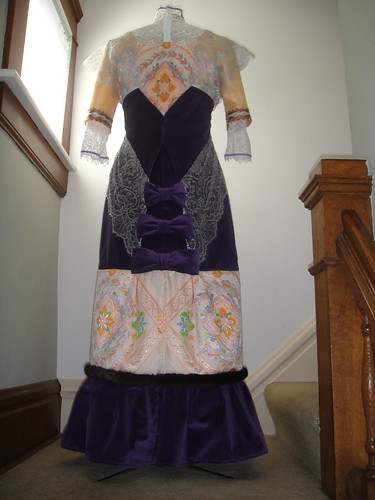
So, the dress Dee wanted was one that had sold at Antique Dress several years ago, but I had kept the pictures because I loved it so much. Like many dresses from this time period it is inspired by the Japanese kimono. I love the colors and the assymetry of it. It is just so elegant, and it has just a touch of fur; perfect!
This is obviously an evening dress of some sort, probably dinner. Dee needed her dress to be for Tea, a semi-formal daytime get-together. I suggested that I make it as an evening dress, but add an undershirt called a guimpe, to make it day wear appropriate. This was no the plan. That way she could just take off the guimpe, and -poof!- ball gown!
She then showed me the most awesomest petticoat ever, and I reproduce that, too!? " Of course!" I am a glutton for punishment. :-)
The petticoat
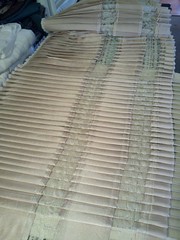
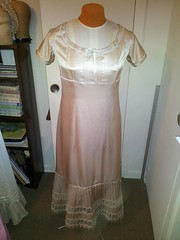
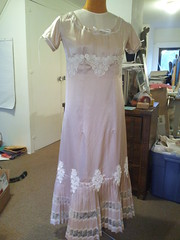
Sorry, no progress pics. I was too focused on sewing. I used a vintage pattern from Past Patterns and it is made from the cotton silk blend poplin from Fabric.com. The pattern was very simple, but to make it do what I needed took some more effort. I needed to be able to have a top yoke that was pin-tucked. The join of the yoke to the body was where some of the appliques would go, and I was also going to delve further into the world of 'insertion lace'. I have done this a few times, and I really like the results, but it is SO time consuming.
Here is a picture of the pleated frill in process and then one of the petticoat finished except for the appliques, and one with appliques. They needed to go on last. The lace in the frill is a silk vintage reproduction from Britex fabrics. They are not the least expensive place for lace, but what they have is so amazing you have to get it.
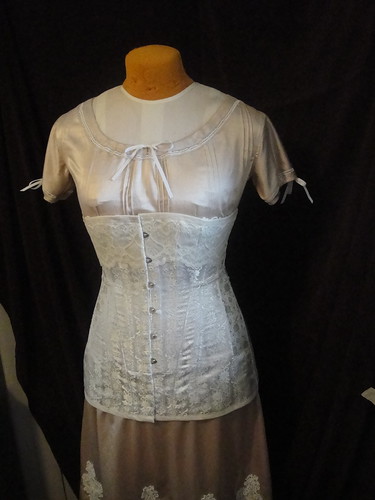
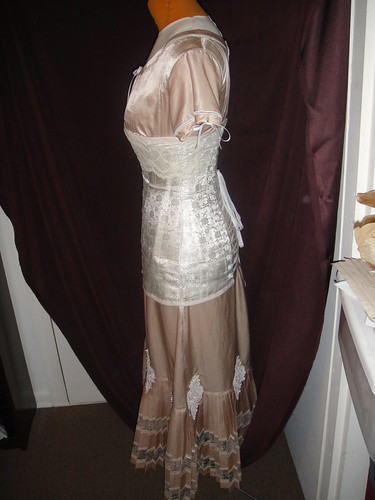
The corset
I had made a stunt corset for Dee in Dec. so I could do a fitting for the inner bits fo her dress, and build it while 1300 miles a away. (I will let you know if that was successful in a few days!) Her actual corset was a matching fabric to the Victorian one I made her for the 1860's Ensemble. A Chinese brocade called giselle from Corset Making. I used the new Reconstructing History pattern for the 1910's corset. It is extremely quick to put together, and makes up beautifully. I needed to only make a couple of modifications for sizing. It is a beautiful thing!
I have the corset over the petticoat in these next pictures for the length when I was going to be doing the dress. The petticoat is not the chemise or camisole and should go over the corset, but since I was making the dress on the dress form, having the corset on top helped me not catch it in my stitches.
The guimpe
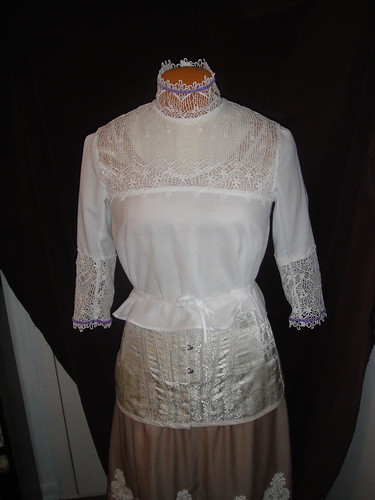
This is basically a shirt where only certain parts are meant to be seen. I wanted the neckline and lower sleeves to be decorative lace. My first thought was to do this like insertion lace, and just cut the cotton away. The problem with this is it left weird shaped edges to hide on a fabric full of holes. I was able to make this process work for the sleeves, but the entire neck and upper yoke are made directly from the lace. If you do this be very patient! All those squirrelly ends and pieces were very exciting. -sarcasm- I found if I stabilized my edges with 1/4" twill tape, they were much better behaved. I also needed to stabilize the collar with some net to keep the heavy venice lace form sagging in the design. I used an iron on nearly clear interfacing, and the stitched the offending areas by hand. I have a much greater appreciation for little tiny hand stitches. :-P I used the guimpe that is part of the Laughing Moon Teens era evening dress pattern. My only complaint about this pattern is the tissue paper. I despise tissue patterns. I would always rather pay more good paper. -steps off soapbox-
The colored velvet ribbon at cuffs and neck matches the detail rose on the front of the finished gown. And finally, I finished the back with more of the vintage mother of pearl buttons. I will be sad when they are all gone.
The dress
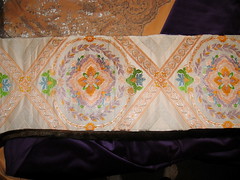
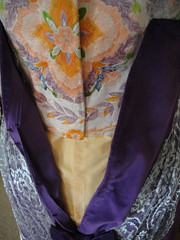
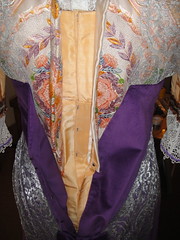
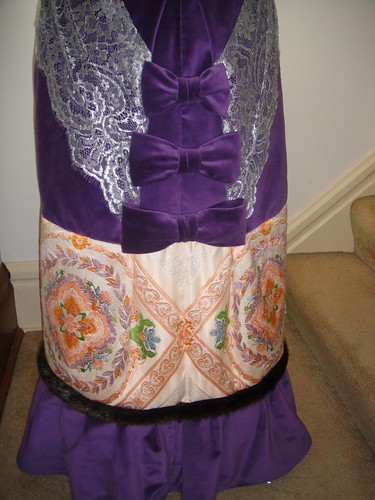
In trying to reproduce the vintage dress, it rapidly became obvious that finding all the necessary fabrics and trims was going to be impossible. -sigh- The biggest issue we had was finding the wide beaded and embroidered net trim that was the focal point of the entire dress. I looked everywhere, no go. So, when looking for alternatives I hit on the idea of saris or obi. After shopping these both for several days, I lucked across a site in Japan that specializes in kimono, obi and all manner of other Japanese cloth articles. They are Gorgeous!! There were so many pretty ones to choose from. We decided that once we picked the obi, that would determine what our final color scheme would be. You can see on the right the obi we picked. It is approximately 70-80 years old, embroidered in marvelous shades of peach and purple with blue, green and silver as accents. It is hard to see the other fabrics in the picture, but it will make more sense later. I had no idea how heavy or stiff obi are. Luckily our design worked well with this, but I was worried at first. I also had to iron the lightest interfacing I could find to the entire back of the obi because the threads are completely loose! That would have been a nightmare one I started cutting into it.
So now with the obi chosen we decided to go with more of a Spring color palette. Our base is a peach silk blend with the contrast in a purple cotton velvet. Trying to find a lace was nearly impossible without going with the real thing, so all the lace is French chantilly in silver. It has an awesome sheen, like liquid metal.
I used the Laughing Moon pattern for the basic shape of the dress and then proceeded to drape the entire rest of the layers onto it. The first and most important part is the boned inner layer. This helps the dress keep shape over the corset, and gives a sturdy foundation to keep your layers hanging properly. Do not ever skip this part! Mine is of canvas, and I fitted it to Deeanne in December when I saw her last. If this fit, everything else should, too.
Now, the fabric starts getting added. I did as much by machine as I could at this point knowing later it would all be by hand. Here is a picture of the base dress in peach over all the under pieces. This would be where I realized that our petticoat was beautiful, but did not match the neckline of the dress AT ALL! Grrrrr... Luckily this doesn't matter for the day events, but should she ever need to wear it for the evening, I will need to make her one with a square neckline; you know, like the dress. Duh! Never occurred to me until then. -sigh-
From this point on it was all about deciding the order to add the layers. I am so glad I have a pinable dress form. It was so necessary to be able to pin right into it, to check for shaping and placement. I kept running out of pins because they were all stuck in the mannequin!

Did you know that Obi are actually armor?
I didn't either until I started hand sewing into one. The background material is so dense that it repels the needle. I am pretty sure my fingers are as perforated as the fabric! Shaping the obi to my dress proved interesting on two fronts, 1) it is very stiff, and doesn't take kindly to curves and 2) the design is not perfectly symmetrical. I cursed a lot.
I did finally make it conform, but the top pieces are very much like the pieces of a breastplate. This picture is right after I got the front sewn on. The back was where the symmetrical part came up, because I needed to have it split off center so that when closed the design was centered. That took a day.
Once the top obi parts were on, I could start draping the lace. I was using two different laces. The bottom is From High Fashion Fabrics in Houston, and is a gorgeous silver woven on gray net. I could get this as a wide double edged fabric, which was as close as I was going to get to 14" wide lace I was looking for. It ended up working great, but I hated cutting into it. The top is an 11" lace from Britex that is silver woven on white net. It is interesting how different they are and still work well together. I needed a narrower trim at the shoulder to simulate the kimono sleeve.
Figuring the drape and closure on the back was a giant time consuming, frustrating endeavor, but I won! Have I ever mentioned how much I love bias? It is the best attribute of woven fabrics ever! The front point, back, and the sash all rely on it. Love it!
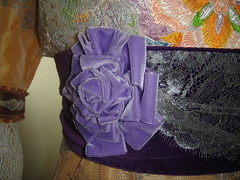
My velvet ribbon rose was one part I expected to be easy, and it was anything but! I tried and tried to find a tutorial online, and couldn't find one dealing with ribbon. I really did not want much of the backside to show. So I ended up doing a combination of techniques. First, I did a rolled technique where I folded the ribbon in half, and wound it around itself a few times, unfolding a little as I went to get wider. When I could not continue, in that way, I stitched my bottom together, and started folding petals from tabs. I would fold a couple of inches of ribbon into a tab, and then pinch my tab at the bottom folding it into different shapes to get it to lay nice as I went around my center. I stitched as I went, mostly around the bottom, but also up through other petals to make them lay nice and open up the upper portions. The bottom layer is tabs that I folded and then twisted the entire tab around to scrunch the bottom, adding dimension. Again I stitched this as I went around at the bottom and up though the previous layer. My final petal, I folded over and stitched down. I used 1.5" velvet ribbon from MJ Trim, and it took about 3 yards. I was very pleased with my finished rose.
Closures on this dress are just as complicated and in nearly as many layers. There are hooks and bars on the inner boned lining, the foundation dress and skirt, and the velvet overskirt. My bars on the velvet had to be thread so that they wouldn't show. I learned how to do these in a vintage sewing book, and they are the bomb! Basically, where you need an eye or bar to be make 3-4 stitches about the length of your bar, say 1/8th", leave them slightly raised. I do this by sewing over a safety pin bar. Remove safety pin, and then do little macramé stitches around your thread bar. These make sure your hook doesn't catch the individual threads and makes the entire thing stronger. When you cant fit and more on, knot and tie off. They match, are fast, and can't hardly be seen, especially on velvet. Love them!

Here are some finished pics. There are loads more in my flickr set High Tea, and I will hopefully be adding some more when Dee has her Photoshoot, so check back for those. Next the Hat!

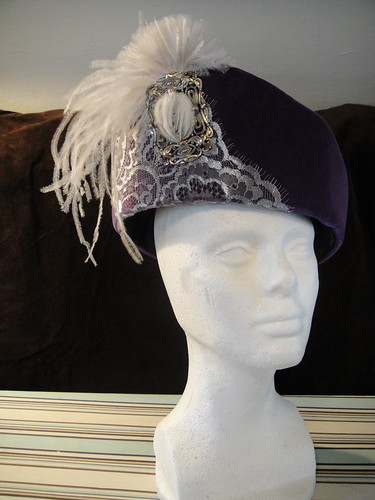
The Hat
Thank you to Lynn McMasters for making such awesome hat patterns. I would be bald if I had to try and figure it out on my own. :-)