
Passementerie: How to create stand-alone miniature works of textile art.

Passementerie: A French word meaning trimming, as in braids, gimp, tassels & cords.
I take this a bit further, and think of passementerie as a trimming that is created away from the the garment and then added later. This could also be any woven, braided, or hand-made trim, for example: gimp. Many examples of passementerie are made from different types of cord manipulated to create shapes that are then stitched together, and perhaps further trimmed with beads, tassels, knots, etc.
These can be a lot of fun because they are small. When you are in the middle of an enormous project, it is really awesome to be able to make individual pieces that are complete in a matter of hours or minutes instead of days! I completed a reproduction of one of the beaded pieces above this winter, when I had several other things I should have been doing.
What to use to make one of these things
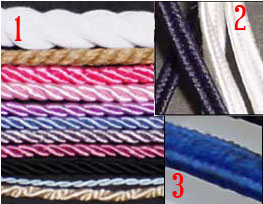 As I mentioned above passementeries were typically made of 1:round cord or several varieties of flat braid, like 2:soutache or 3:president. Soutache and president braid are very similar. Soutache is a flat braid woven around two cords with a defined ditch in the center. Presidents braid is woven around a central cord with two flanges at either side. With both types of braid you can pull the interior cords to help with curving.
Round cords were often used as well, and these are the best for beading, in my opinion because they give more dimension.
All of these are typically made of rayon, which is lovely, but wont melt when burned, so you will need to tape and/or wrap your ends in thread to keep your piece from unraveling.
Let's get started: What you'll need
A picture of the piece you're making
Your choice of cord
A piece of cardboard big enough for your finished piece
A box of little flat headed or "T" pins
A long sharp needle, and a beading needle if beading
Thread, waxed is best or beading thread
beads (optional)
Okay, here we go: Creating the motif
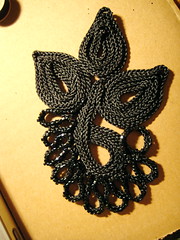
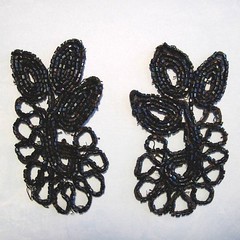 Here's my picture. Eventually I will make both, and I already had plans for a little extra! How can you have Victorian clothing and NOT have slightly over the top trimming?
I cheated. I used a 100% polyester cord to make mine because I had it laying around, and I knew I could melt the ends saving myself a lot of trouble and time. Plus, I knew I wanted to bead it, so I figured the beads would hide the not so fabulous cord. I measured off a yard length for each of my leaves.
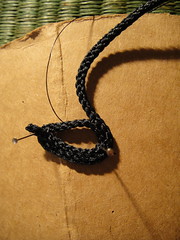
 The first step is to secure the end of your thread. I melted mine. If you are using a rayon, wool, cotton or silk, you will want to secure it with some tape and stitches. Your starting point will be completely hidden by the piece on the underside, and will be gone from site forever when attached to the finished garment. I usually fold 3/8 of an inch over and wrap it in my thread and then stitch it back and forth through my wrap a few times for good measure.
On the vintage ones in my possession, they did not care AT ALL what the back side looked like.
OK, so once your end is secure make the first loop of our first leaf and tack in place. We will be making three if you are making this same design. Add more leaves if you want. Odd numbers look better though.
I tacked my end down and pinned it to my board. We will be wrapping the cord around and pinning it to the board makes it easier to keep it all in one plane. You want it as "flat" as possible, so your bead work won't look lumpy.
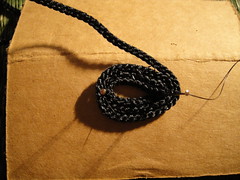
The Backside of the work is facing you, so as you wrap it, makes small stitches through your rows attaching them to each other. I did mine right at the surface. Do not go across the gap though, since those would show.
 As I wrapped mine, I pinched the top point a bit to sharpen it, and after four turns I left a little loop at the top to act as my point. Finish stitching that wrap all the along the side and when you come to the bottom knot off your thread. Leave the excess length. You now have a finished leaf! Do this two more leaves. Make certain that at least one of them is coiled the opposite direction so that the motif will be balanced.
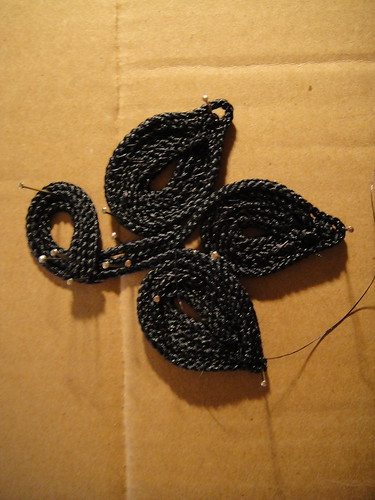
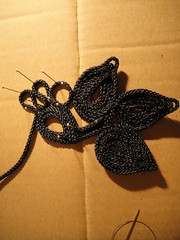
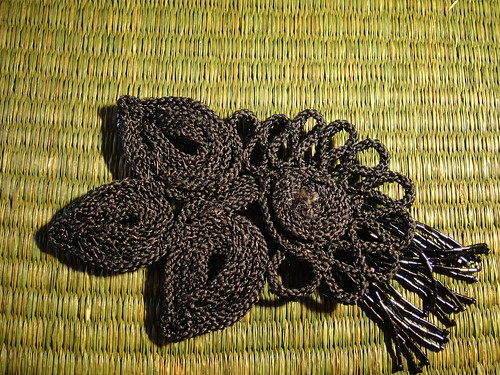
Now, take your three leaves, and let's arrange them on our larger piece of cardboard. I had to refer to my inspiration picture a lot at this point. Pin the leaves onto the board, using as many as necessary. This picture is after I had stitched them, there had been lots more pins!
You can see my top leaf is the one that coils the opposite direction. Also take note that as you work it in against the other two, its tail folds back on itself before it goes into the rest of the stem.
Pinning the entire motif down like this makes it much easier to keep it from distorting. Pin your stems down and together. Make sure you pull the loop far enough away from the leaves to work in the loops. The negative space between the parts of the motif add dimension and make it easier for the eye to see what's going on.
I stitched my stem together very loosely until I got the loop positioned. I took the ends all the way to the edge of my stem to make it as stable as possible. Once you are happy with the position of the loop, go back and firmly stitch the stem to itself. Wrap/melt your ends together and tack the tail-end to your stem.
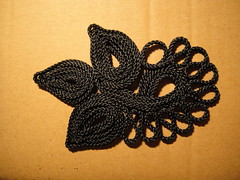
You now have a finished leaf passementerie. A whole pile of these in colored soutache or small cord laid out around a skirt and jacket hem, as if they were blowing in the wind, would look amazing! This portion took me about 45 minutes!
Adding to the design: Loops
The serpentine design of this next step involves a LOT of pins and some finesse. Cord is springy and not so interested in laying in really nice coils. Be patient! This is the highlight of this piece, and you won't regret the effort.
 Make certain you are still working on the back of your motif!
The tail of this step actually nestles in the weird little folded back quirk in the tail of the last leaf. Just tack it right on top of it, and pin this cord down following along your stem.
You'll want to play with the placement and size of this first loop. It is your only actual loop, being round, where the rest of the design is a serpentine ribbon folding back and forth, tacked at regular intervals.
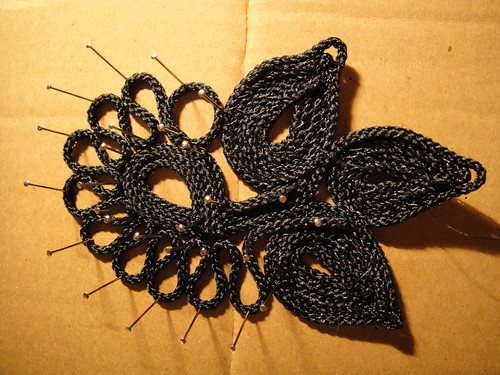
I stitched down my tail to the beginning of the loop, and then pinned the entire thing in place before I finished stitching. I had to pin and un-pin it several times to get the loops to be even, look right, and have enough tension to actually rest against each other. Pull your end tail up on to the piece, clip, and finish.
Here is where having the entire design pinned to cardboard is great and a pain, all at the same time. You can see you finished design, but stitching your piece can be a little irritating. I promise though, it is all worth it!
Stitch the loops wherever they touch themselves and the motif. I heavily stitched all the junctures, knotted my thread and then hid the thread in the cord on my way to the next juncture. You could knot and clip, but I was lazy. The only thing you don't want is any of your stitches to show in the negative space.
The pinning took about an hour and the stitching another 45 minutes.
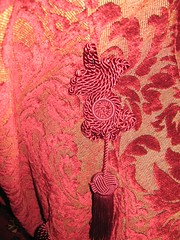
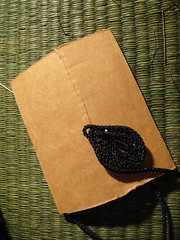
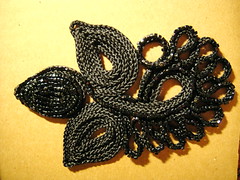
Now you're DONE with your first full motif! Flip it over and admire your handy work.
I recommend a glass of wine at this point.
Beading: Let's add sparkle
Glass beads are cheap. If you intend to bead this I would suggest buying two or three choices to gauge the shape and size that will work the best. You are now working on the right-side of your motif.
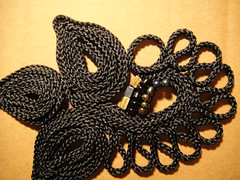
 I tried out three different sized and shaped beads in the first picture, and disliked all of them. They were just too big. I was actually trying really hard to not use itty-bitty seed beads, but I did anyway. You can see how much better they match the size of the cord.
I put my beads down 3-4 at a time, but never more than 5. Sometimes where the turns get really tight they have to go down in pairs or one at a time. You may also have to couch a little between beads to get them to stay on the ridge of the cord. This is why you want the right side as flat as possible.
I had never done this kind of bead work before, so I fumbled my way through it. It took an entire package (14g) of 1.8mm iris cubes. That is A LOT of beads. This was my least favorite part, taking 6 hours, but it was just so pretty in process, I couldn't stop myself!
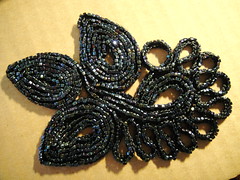
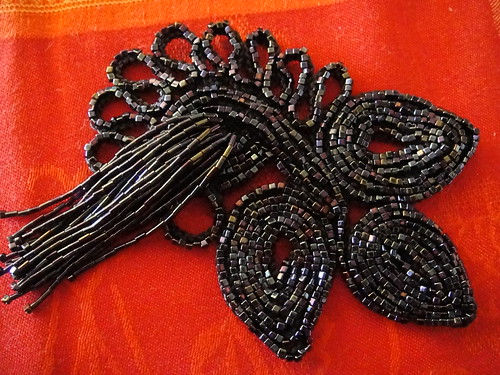
Yeah! Now you have a finished, beaded motif. You can be completely finished here. I am a glutton for punishment, so I went a step further.
Flash: Potentially unnecessary additional decoration
I was so excited at this point by how cool it looked, I decided to make it a little flashier and add some movement. I had already decided that I would mount this by itself to a reticule or muff, so movement would only add to the sexiness!
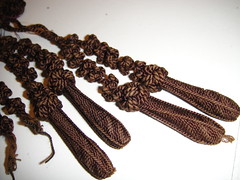
Enter a beaded tassel. Unfortunately I was so enamored with myself that I did not take any in-process photos of this part.
These are REALLY easy, just somewhat time consuming. I took my cord and made my 3/8 inch fold in it and tacked it down. I now proceeded to spiral around my "knob" which is now perpendicular to my spiraled cord coin I am making. I coiled it around and stitched it all together, till the entire thing was about 1 1/4 inch across. I now had a cord disk with a knob poking up in its center.
What I was doing was creating a support for my tassel. I now knotted my beading thread into my support and strung 22 matching bugle beads. This is about 2 inches long. I then added a cube as the last bead, skipped it, and pulled my needle and thread back up through my strung beads. This is one strand of your tassel. I worked from side to side adding beaded tassel strands until the entire surface of my support was covered. The strands will fall so they are not completely even. If you care about them being even the add a couple of beads periodically to the length as you work your way up and over the support.
Once it is finished push the ends of the tassels through the open space of your stem. The disk rests against the back of your motif and the tassels spills out to the front. I had to turn my tassel until I found the spot where it laid the best. Then I tacked it in place, and VOILA! This took about an hour.
This is just one idea on making yourself some really fun and amazing pieces of extra decoration. They are often used on coats, dolmans, and the backs of dresses. When you perusing old magazines online look for terms like garniture as well as passementerie. Also, you can get some really great ideas form military uniforms. It was all the rage throughout the Victorian era to use motifs similar to the men's uniform coats on ladies jackets.
I hope you have enjoyed this project, and I look forward to doing another article later on Frogs and Closure using the the same techniques.