
Deeanne Gist and her adventure in Victorian clothing
I am reproducing this outfit for Award winning author Deeanne Gist. Check her out, and check back soon, as I will start updating this as pieces get completed. I am still in the fabric accumulation process for her underwear trousseu.
Update
on 2016-05-20 16:43 by Kelly Cochran
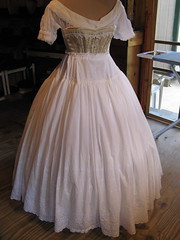
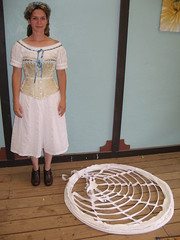
Technically the "trousseau" was the garments, linens, and accessories a bride brought to her marriage. I tend to use the term when I have a customer that requires an entire set of underwear. Deeanne Gist requires everything for her upcoming outfits. And so, I have been working for a couple months on this set of undies. Her trousseau consists of a set of open drawers, chemise, corset, elliptical hoop, and petticoat. These will be the foundations for the pretty wool dress I am going to make her, as well as the blue moire ball gown.
I only really took a few pictures of the process of making these garments. White is hard to photograph. I found a really great fabric that had pin tucks and embroidered stripes.
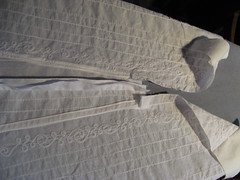
It really is white, but it was too hard to get it to show up with the flash.
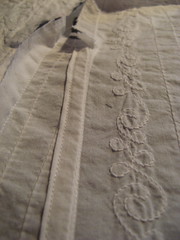
This is the back-side of the fabric and a flat-felled seam on the chemise. The chemise and bloomers are the same fabrics. I used the tucked fabric for the body of the garments and a white muslin for facings and yokes. I am putting lace around the yoke of the chemise so did not want the look of the tucks and embroidery to interfere. I also thought it might be more comfortable for the fabric that will be in tight places to be smooth.
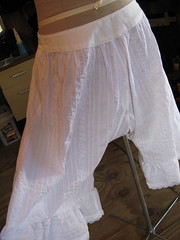
Here are the open-drawers, or bloomers. They are open to allow for ease in the Necessary. I have installed a couple of snaps for modesty's sake. The bloomers go on first, and sit a little lower on the waist. Waistbands can add up when stacked on each other, and can also be uncomfortable when too many are under the corset. So a smooth drop-waisted yoke was employed to get a reduction in fullness. In later decades of the 19
th
Century, the chemise and drawers would put together in a garment referred to as "Combinations". Near the turn-of-the-century the use of princess-seamed slips became popular. This combined the chemise and petticoat, but was still worn with drawers.
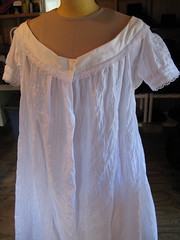
Over the drawers goes the chemise. It is long and full for modesty, and has a scooped neckline. Often it was common for a set of skirts to have transitional tops. Meaning, that an outfit would consist of one set of skirts, but have an evening and day top. The chemise needed to work for both as the time necessary for completely undressing may not be possible. I made this chemise with this in mind. It will work with both the day outfit, and the ball dress.
My plan is to have a layer of insertion lace on the neck yoke with blue ribbon in it, but that has yet to arrive. It may need to wait until I see it again.
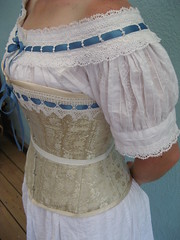
Over the chemise and drawers can now go the corset. I found this lovely silk brocade that combines all our shades of white, cream, ivory, and ecru. I must say that I currently have corset envy. *smile*
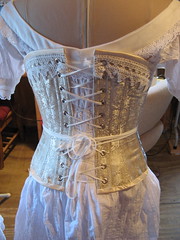
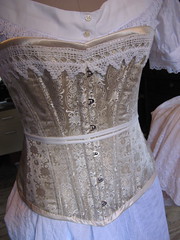
My plan is to add the ribbon to this trim as well. The lace on the corset is vintage and hand-crocheted.
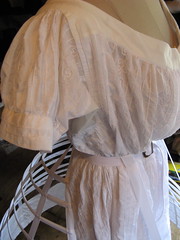
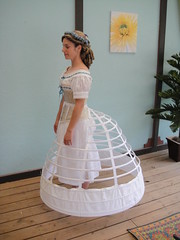
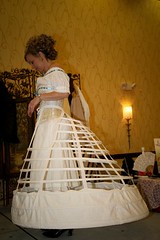
Over all of this can now go the elliptical hoop.
The elliptical refers to a short time period when the hoops were transitioning away from full round and starting to lean in a bustle direction, this pattern is dated to 1865. This is the Truly Victorian pattern. While immensely time consuming, makes a great hoop, and I think it makes a wonderful foundation.
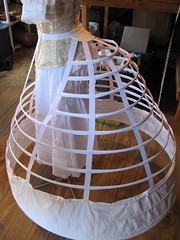
What makes this elliptical is the set of very ingenious tapes at the back that rest against the buttocks and legs. These support the extra depth to the arches so you get that fullness-to-the-back look. I stuffed some extra fabric under the chemise to approximate the correct shape as my dress form is deficient in the derriere. Here is a picture down through the hoop at back showing the stay tapes.
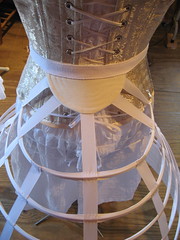
the belt closure at the waist makes it a very flexible garment to wear. It is easy to adjust to size. Here it is sitting right at the waist. The buckle is offset to keep the center front as smooth as possible.

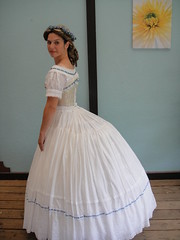
And finally, over all the foundation goes the petticoat. It is a little entertaining to make an elliptical petticoat. The general consensus is to use the skirt pattern, and just add your eyelet lace, tucks, ribbon and frills to this. Well I had found 8 yards of this really pretty vintage off-white cotton with white embroidered eyelet. The problem, it was only 36 inches wide. So my solution was to make a yoke that was the skirt pattern and gather all that eyelet to it. It worked really well. My eyelet was almost sheer.
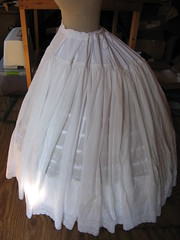

So I decided to add another layer of muslin to the underside attached to my yoke. Of course this means I should have made the entire foundation skirt, and gathered the eyelet to that, but... *shrug* . This worked great, and I was able to capitalize on selvages. Selvages are good. :-)
Now that the trousseau is complete, I need more measurements for the Ball gown that will be required in a month. We are doing a very simple and elegant ball gown in slate blue moire with a band of embroidered blue and gold floral trim at the hem. So exciting! Check back soon, for more updates.
Update
on 2011-06-09 18:25 by Kelly Cochran
And finally the update!
I am not actually cool enough to have pictures of Deeanne in her new Ball gown, but My good friend Rhonni, and Erica as my model, helped me take some pictures and shoot a little "Here's how you get dressed" video for her.
So where to start. In our last update, I had finished all the undies, and had sent the pieces off for measurements. Well, that went swimmingly, and I got all the measurements I needed. The only problem, they were completely different. Luckily I opted for taking the corset a little small, so the really difficult piece still fit, and the hoop is adjustable. What this did mean though, was that the chemise did not fit, at all. Luckily I was able to just pull the neck facings off, and put new resized ones on. The new neck band is 9" smaller than the original. Her wonderful seamstress friend went ahead and pinned the facing to the appropriate size, so I made her a custom fit one. This one will fit much better.
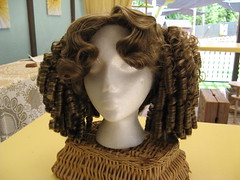

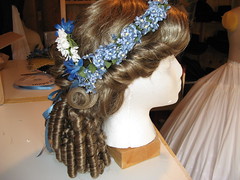
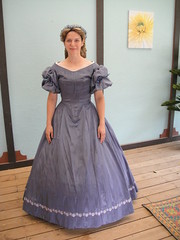
I also received the wig. It is really a lovely wig, and she sent me some really great pieces to work with. Should you ever want lovely wigs for your reinacting fun, I highly recommend TracyLynn Gomez at Making Your Dream Come True. She sent it to me in with a very cute day style, that would look great with a bonnet. I really wanted something for the Costume Ball that happens after the award ceremony at RomCon that Deeanne is going to in Denver, CO on July 9th. So this needed to be something more evening like. I had looked through a bunch of fashion plates, and finally found a line drawing that I really like, and I determined that I would make the head piece as well. What lovely Victorian lady in 1863 wouldn't have a gorgeous head piece to wear to the ball? So here is the plate.

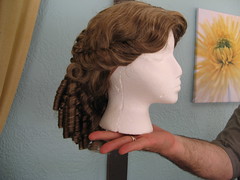
Not having ever done wigs before, this was a fun learning curve. I finger combed the wig out, and re-styled it to match my fashion plate as close as I could. I pulled the clip out of one set of curls and mounted it to the wig beneath my bun, and I twisted the bangs in tighter to the head and around to the back. Bangs were just not done yet, but the wig had them. Luckily they were full and long, so with gel and pins they went where I wanted them. This is how that finished out.
If you want something very similar to what I did from TracyLynn, she has a new style now, called the Lady Antebellum.
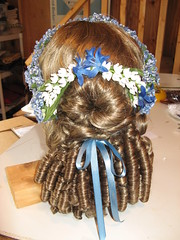
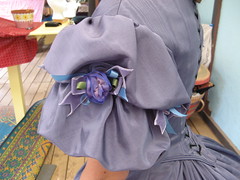
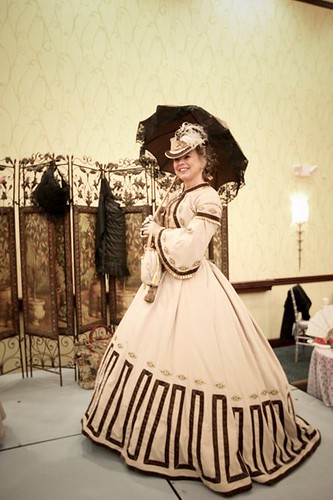
For the headdress I really wanted something that would compliment the dress, and be indicative of what would have been worn in the 1860's. So using my fashion plate I combed through several hobby and craft stores looking for the right flowers. I ended up making a garland of paper and silk flowers, accented by silk ombre roses, and femo lily's of the valley. I made the entire thing on floral wire, and used 2 pins and my ribbon to keep it all on.

So once I got the wig finished, I went back to finishing the undies. It was fun working on something so different, but back to the white cotton it was. At this point it was mostly trimming. Although with the change in measurements, I realized Deeanne is actually an inch shorter than what I had for her. So I took a tuck in the petticoat to help make up for that change.
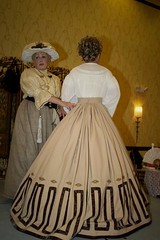
Adding blue ribbon and white lace to the trousseau was nice. It really added the finishing touch and told me that I was almost done. Done! I love done. Here are some pictures of the finished underwear. Thanks Erica!
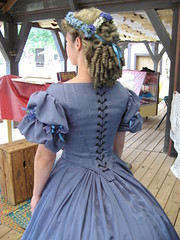
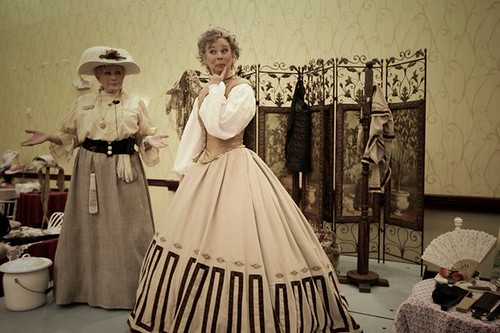
On to the ball gown! :-) I used a really pretty slate blue moire with just a touch of purple in it. It is a very simple and elegant gown with just a touch of trimming at the hem, and small touches on the sleeves. I used a trim that has more purple in it to pull all my trimmings together.
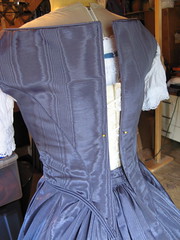
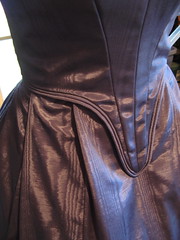
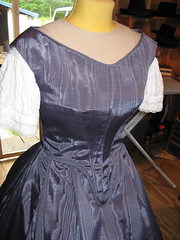
I was in such a hurry to get this done, that I did not remember to take any interior pictures. I faced the skirt with canvas to give it some body. I used the same canvas as flat lining in my bodice, and finished it with piped facings. The bottom edge is double piped, and the neckline, and arms eyes are single piped. I trimmed the sleeves with purple and blue bows, and silk roses that match the headdress. I would have liked the time to do hand bound eyelets, but that wasn't in the budget, so the back laces with grommets, and finishes in a point.
Here some of those pictures. There is also a ton more pictures on my Flickr page.
And here is the promotional video for the Getaway with Dee. If you at are at all interested in spending a week at the Biltmore Estate in NC with Deeanne having loads of Victorian fun, go to her page and check out all the neat stuff that is happening. That will be the event where she will be getting dressed in all these pieces and wearing the Day gown that I will be putting together soon.
Update
on 2011-01-02 00:09 by Kelly Cochran
Final Update: 12/30/10
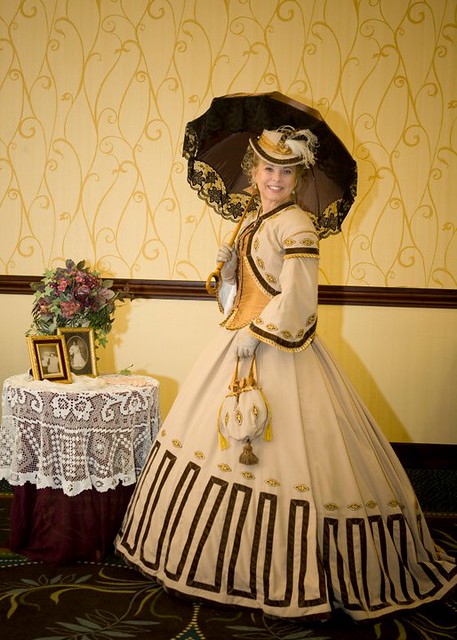
To finish out Deeanne Gist's Dress Journal, let's move on to the day dress.
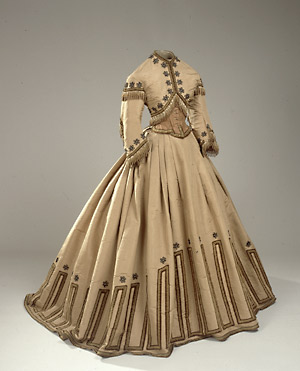
The original is made of tan silk faille trimmed in a striped velvet ribbon that was rouched. The little appliques are black lace, and the vest is a warm pinkish tan silk with self covered buttons and an edge of small tasseled fringe.
My version, is tan summer-weight wool, trimmed in chocolate velvet ribbon, and my appliques are embroidered with chocolate and gold, and applied with a little of the praline colored silk that I used for the vest. I also covered my own buttons and found an adorable fly fringe in chocolate/tan/gold to edge the vest in. All in all I think it is a passable reproduction of the original. :-)
To match I also made a hat, a Garibaldi blouse, reticule, and a Swiss waist. I wanted her to be able to wear the dress is as many situations and weather as possible. Not everything may be indoors!
I do not have many in-process pictures. This was the summer of insanity. So I had two enormous commissions to finish during the run of Bristol, and with the medical adventures, I ran long on all of them. This is to say I was way too busy to stop and take photos. -sigh-
So here's what I got!
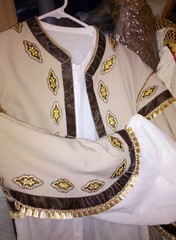


I still need to find or make a collar and cuffs to hand apply to the blouse, but it is super cute. It is Truly Victorian's Garibaldi Blouse, and I loved it. I gave it mother of pearl buttons, and trimmed the front and seams in cotton lace. The appliques and velvet ribbon is from Cheep Trims, and was a dream to work with. It was really beautiful and soft, almost a silk velvet texture.
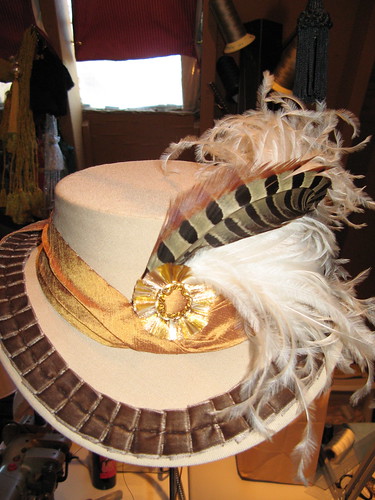

Here's an up close picture of the hat. I was really pleased with how it came out. She is a small woman and did not want a hat that would swallow her head. Our original concept plates were all a similar mid-1860's curved style.
I used all the fabrics from the dress in the hat. I even used one of the appliques at the center back. There are of course more pictures to be found in my set on flickr for Deeanne called Victorian Romance.
So, the whole purpose of this event was to wear it at the Biltmore Estate for Deanne's "Getaway with Dee" event. I would love to have gone, but Deeanne graciously shared her pictures with me, and that is almost as good!
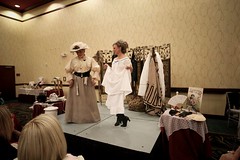
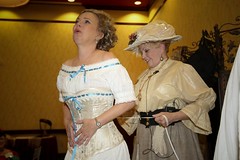
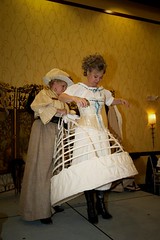
The specific event was where Dee was going to be dressed by a "Victorian expert". Starting the exhibition in her Chemise and bloomers (scandolous!), and then completely dressed all the way to her reticule and parasol.
Here are some of those images:
As I mentioned above there are plenty more pictures on Flickr. This was a great experience. Deeanne is a delightful person, and it was a learning experience with making nearly everything without getting any feedback on fit. I finally met Dee in October and was able to put her in everything myself, and take notes for changing some things and for orders in the future.
For now, I am going to do a little work on the Zouave jacket and vest to help them fit better. I am also going to replace the covered buttons with something less difficult. Silk is so hard to make good buttons with, even when you back them with a stiffer cloth. Oh well!
It has been a pleasure, and I hope you enjoyed this adventure with Deeanne!
This project is (mostly) off the table!
Cheers!